You need to enable Virtualization before using the VMs. It’s on by default, but if you ever disabled it, you need to access your BIOS or UEFI settings to enable it again. We have provided the methods to do so for Windows 11 on different computers in this article. If you need the methods for any other device, seek help from their manufacturer’s website or user manual. You can also do the same if you have trouble executing the methods below.
Check Support for Virtualization
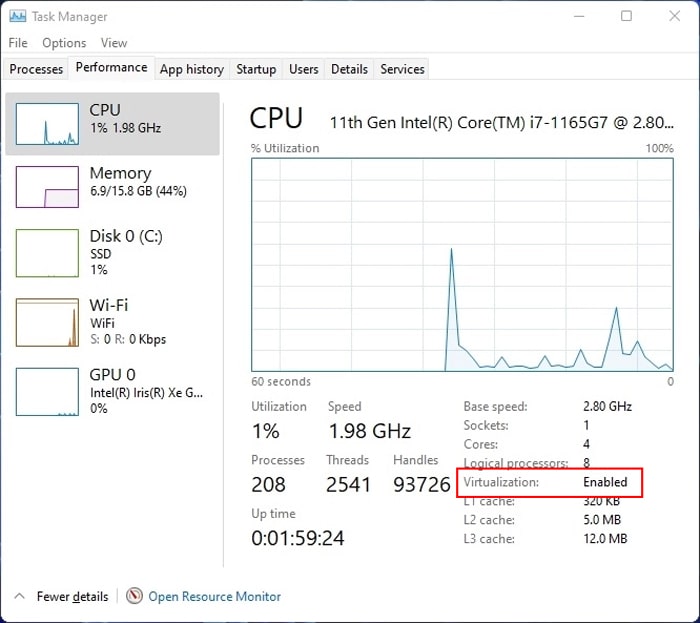
First, you need to check if your PC supports Virtualization. Your processor’s website should provide identification tools to check for support. If not, you can use third-party programs. For Intel Processors: Look if it contains Intel® Virtualization Technology. If it does, your Intel processor supports Virtualization. For AMD Processors: It will check if your processor allows Virtualization and display the result message. You can also check the status of Virtualization on your PC. If it’s already On, there’s no need to go to the BIOS or UEFI settings. To check the status, There are also other things you should not. For instance, you don’t need to enable Virtualization to run a 32-bit OS on a VM. But doing so does provide a performance boost. A 64-bit guest does need Virtualization, though. They will also only run on a 64-bit processor.
Open BIOS or UEFI Settings
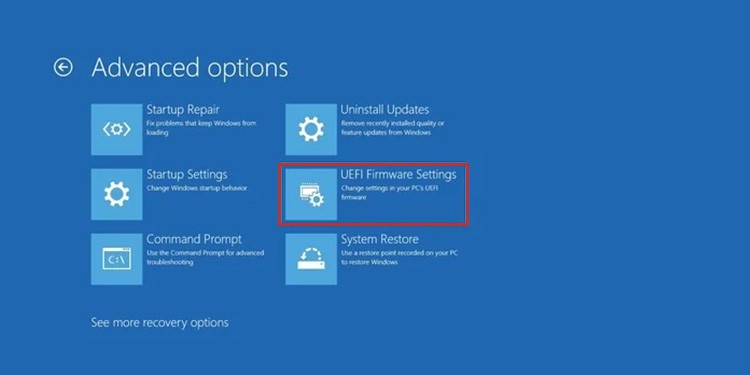
You can press a certain key during startup (Logo screen) to open the BIOS or UEFI settings. Mostly, it’s the Delete or a Function Key. The BIOS key for some computers or motherboards are as follows: You can also access UEFI Settings from Windows Recovery or Advanced Startup. To do so, The reboot leads to the UEFI settings.
Enable Virtualization in BIOS/UEFI
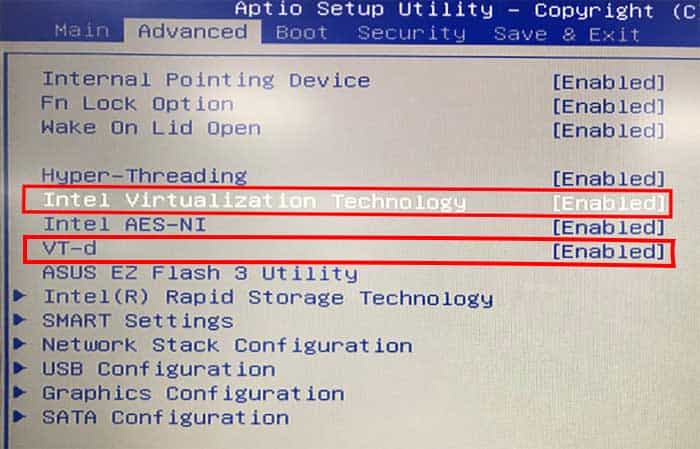
The way to enable Virtualization depends on the motherboard or PC you have. You can find Virtualization options for most processors inside the UEFI’s Advanced tab. Look for Virtualization Technology, VT-x, or SVM to enable the hardware Virtualization. If you want your Virtual Machines to access your I/O devices, you should also enable Virtualization for Directed I/O, VT-d, or IOMMU. Look inside the Advanced, Security, CPU Configuration, etc., tabs to find the VT settings. We have listed how you can enable Virtualization on some standard PCs in this section.
Enable Virtualization on ASUS Motherboard
After opening the BIOS or UEFI, follow the steps below to enable Virtualization:
Enable Virtualization on MSI Motherboard
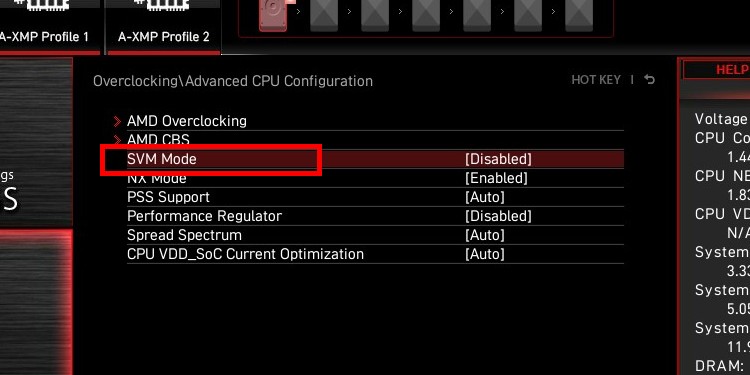
To enable Virtualization on MSI BIOS/UEFI, go to the Advanced tab and enable the following:
SVM Mode or Intel Virtualization TechnologyIOMMU or VT-dIf you don’t find it, look for them at:Advanced > Overclocking settings > OC Explore Mode > CPU Features/Advanced CPU ConfigurationOC > Overclocking > Advanced CPU Configurations
Save and exit to apply the settings.
Enable Virtualization on ASROCK Motherboard
Here are the necessary steps to set up Virtualization on an ASROCK Motherboard: Press F10 to save the changes and exit your UEFI/BIOS settings.
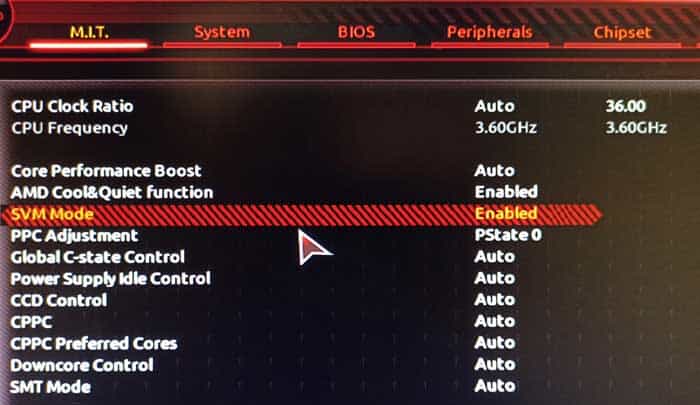
Enable Virtualization on GIGABYTE Motherboard
Apply the instructions below to enable Virtualization depending on your GIGABYTE processor:
For Intel Processor, go to BIOS Features and enable Intel Virtualization Technology.For AMD, go to M.I.T. > Advanced Frequency Settings > Advanced CPU Core Settings and enable SVM Mode.
If you can’t find these settings, go to Chipset and enable:
Intel Virtualization Technology (VT-x)Intel VT for Directed I/O (VT-d)
Then, save changes and exit the BIOS/UEFI. We also have a detailed article on updating Gigabyte BIOS. You may find it useful incase you need to update your BIOS
Enable Virtualization on Dell
Here are the necessary steps to set up Virtualization in BIOS/UEFI on a Dell device: Save and Exit the UEFI settings.
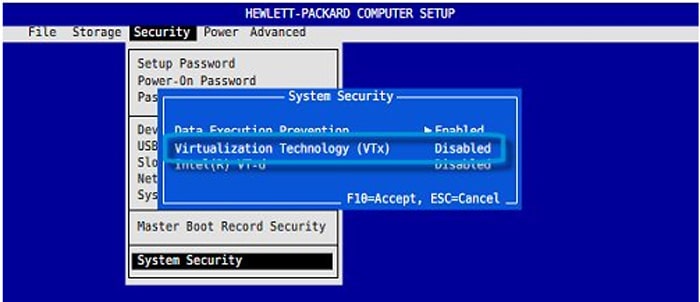
Enable Virtualization on HP
On an HP laptop, perform the instructions below to enable Virtualization in UEFI:
Enable Virtualization on Acer
On the Acer BIOS Settings, go to the Advanced or System Configuration tab. Then, enable the following settings:
Intel VTx or Virtualization Technology and Intel VTD for Intel Processor.AMD-SVM and AMD-IOMMU for AMD Processor.
You must press Ctrl + S on some devices to find these settings. Finally, save and exit after making the changes.
Enable Virtualization on Lenovo
There are different steps to enable Virtualization on separate Lenovo devices. The most common method is as follows: Some devices have the Virtualization options on the Advanced or Configuration tab.
How to Use Virtualization in Windows 11
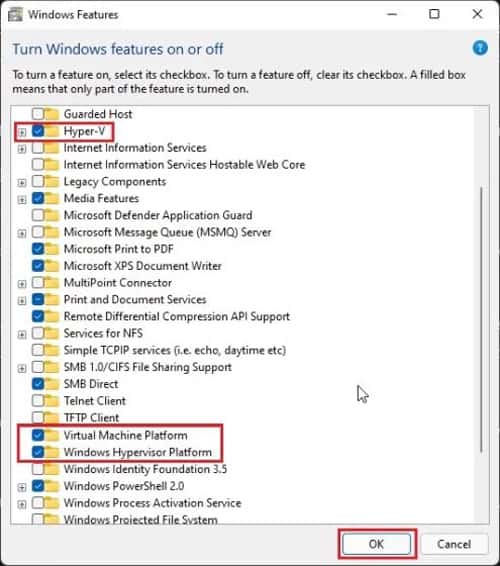
Windows 11 includes a built-in Virtualization feature, Hyper-V, for using Virtual Machines. You need to enable it first. To do so, Then you can create and use Virtual Machines using the Hyper-V Manager. Enter virtmgmt.msc on Run to open the Manager. You can also use third-party Virtual Machine Software. Some examples include VMware Workstation or Oracle Virtualbox. But remember that you need to disable Hyper-V to run 64-bit OS on such applications.
Related Questions
Why is Virtualization Not Working Even After Enabling it?
Virtualization won’t work while using third-party VM Workstations with the Hyper-V feature. You need to disable all Hyper-V processes first. If it still doesn’t work, reboot your Virtual Machine and the host system. You can also try migrating the VM to a different host. We recommend updating all the VM software and tools to avoid such issues. For instance, VirtualBox v6+ includes support for Hyper-V, so you don’t need to disable it to use this program.